(old computer programmer joke about the problem could be between the Chair and the Keyboard)
Or
“Things that I have learned and do not want to forget “
For Beginners I recommend the book I started with by John A. Nelson
(We share the same name)

After that here are the things that I pass on from my experiences.
I cannot use round blades have tried several times so these are based on flat blades
I will share my techniques for receiving compliments on my wood cutting projects. Firstly, I want to express my gratitude to the creators of true vector graphic patterns. Their product enables me to easily convert patterns into thin red lines with a very light gray fill, making it simpler to identify and cut along the lines accurately. I have learned that having a high-quality pattern is crucial for a successful project. A clear and sharp pattern allows me to precisely cut along the lines. I always aim to cut directly on the line itself. Selecting the right blade and wood for each project is the next crucial step. I typically use ¾” Cherry and Black Walnut for my work, as I made an early decision to avoid using plywood for projects that require a significant time investment. When I discovered the Flying Dutchman Ultra reverse blade, I found a blade that almost effortlessly follows the cutting line. For 90% of my work, I use a #5 blade, switching to a #1 or #3 only for extremely small interior cuts. Currently, I primarily use the Pegas Modified Geometry #3 for most cuts, especially for intricate designs where the larger #5 blade makes it challenging to follow the pattern’s detailed design. I make an effort to stay relaxed and not dwell on thoughts of when the project will be completed. I do use an electric-armed clock with an on-off switch to track my cutting time, as it helps me address the common question of how much time a project took and also assists in determining pricing for my sold items.
Wax the tabletop using Johnson Paste Wax, which can be found in the yellow can. It is recommended to do this at least once a week or whenever you notice a decrease in cutting efficiency.
 SORRY NO LONGER AVAILABLE
To prevent the blade from slipping, take out the Thumb Screw and clean its tip thoroughly. Ensure that it rotates smoothly. Create 7/32-inch holes in a thin board measuring 1/2 inch in thickness. Insert the thumb screw and set screws into the holes until they are flush with the board’s surface. Smooth out the front side of the board by sanding it until it becomes flat.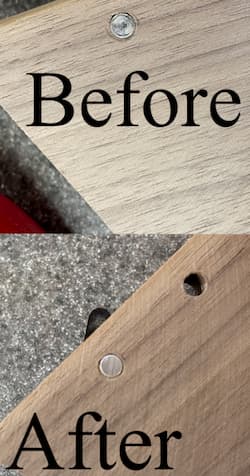
Align the blade perpendicular to the table surface. Ensure the blade is centered within the holder by moving it from side to side (and front to back if precision is preferred over speed). For those using EX type saws with a knob at the back, adjust the arm parallel to the tabletop. If additional tension is required, make slight adjustments. Using the smallest available blade, cut out a 3 leaf clover shape from a piece of 3/4 hardwood. Confirm that the piece slides out smoothly in both directions.
To feed the saw from the top, start by relieving the tension. Release the bottom thumb screw and slightly lift the saw above your previous cut using one hand. Move the next hole towards the blade. Lower the blade gradually and with your other hand, reach under the table to push the blade into the clamp. Tighten the thumb screw to secure the blade. Apply tension to the saw, make the cut, and repeat the process. With practice, you will become proficient in top feeding. Watch the top feeding video for a visual demonstration. https://www.facebook.com/watch/?v=1330130630504288
For cutting 3/4 hardwoods, you can choose between the Flying Dutchman Ultra Reverse or the Pegas Modified Geometry blades. Both options are excellent. The Pegas blade, in particular, offers a slightly more aggressive cutting experience, which is why I have personally made the switch to using it. I recommend utilizing #1, #3, and #5 blades for this purpose.
When working with thick wood, it is important to avoid using reverse teeth. To ensure proper sawdust clearance, consider using the Flying Dutchman POLAR or Pegas Super Skip blades for your 3D 1 1/2″ wood cutting needs. For compound cutting with good detail, the #5 blade is recommended. To enhance your cutting accuracy, utilize a 3D Scroll Saw Cutting Jig like the one created by Steve Good. When using this jig, make sure to leave approximately 1/2″ of wood at the base uncut to maintain stability. Additionally, leaving some wood at the top is advisable. For convenient cutting, start by drilling a starter hole on each side. Once the sides are complete, proceed to cut off the bottom section.
The process for applying Watco Natural Oil Finish involves immersing the wood in a receptacle for approximately 5 minutes. Afterward, it should be placed on newspaper for an additional 15 minutes to allow for proper absorption. The wood should then be dried using both air and paper towels. It is recommended to let the wood dry for 2 days before repeating the process. For trivets, it is advised to apply 3 coats of the finish. To dispose of the used newspaper and towels, simply place them in a plastic bag and cover with water.

The 50/50 mix is stored in one-gallon jars. It is used for dipping and hanging ornaments and 3D cuttings, followed by sanding and repeating the process.

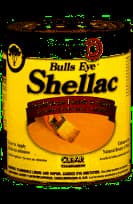
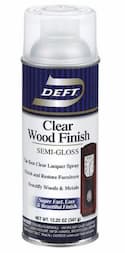
Exercise caution when using the Deft Lacquer Spray, identified by the model number DFT011/54, as certain types are water-based. Begin the application process by utilizing the Watco spray and ensuring it has fully dried. Following that, employ a 320 grit sandpaper to gently sand the surface. Conclude the process by applying an additional thin layer of the Deft Lacquer Spray.
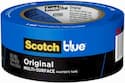
Blue Painter’s Tape for Patterns To ensure clean and accurate cuts, I utilize blue Painter’s tape to cover all areas that require cutting. In addition, I apply a layer of spray adhesive to both the blue tape and the back of the pattern. Despite leaving the patterns glued up for several months, they do not seem to detach. Clear tape is not my preferred choice for covering patterns for two reasons. Firstly, it becomes difficult to see once removed from the wood. Secondly, the presence of sawdust between the pattern and the tape can cause the pattern to loosen and lose its adhesion.
The Duck EasyLiner Adhesive Surfaces is a transparent product that performs at the same, if not higher, level compared to blue painters tape. To achieve the best results, it is recommended to sand the surface beforehand and use a tack cloth during application. From my own experience, I find it more convenient to buy wider rolls and cut them to the desired size using a bandsaw.

The 3M Super 77 Multipurpose Adhesive can be applied by spraying a thin layer onto either the Blue painters tape or the shelf liners. Another light layer should also be sprayed onto the back of the pattern.

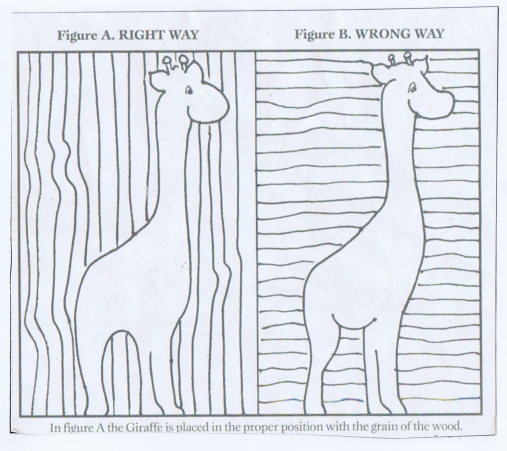
Placeing Pattern on wood